
Advanced File Shredder
Advanced File Shredder User Guide
This guide walks you through Advanced File Shredder: how to destroy files and folders so they cannot be recovered, how to clean out the Recycle Bin and the free space of a drive, how to choose a wiping method, and how to save a report that proves what was erased.
Contents
- What Advanced File Shredder does
- Before you start
- The main window
- Putting files and folders on the list
- Shredding files and folders
- What the "Status" column means
- Stopping a job
- Settings: wiping method, options and passes
- Shredding the Recycle Bin
- Wiping the free space of a drive
- Erasure reports
- Shredding from Windows Explorer
- What is not shredded, and why
- Troubleshooting - questions and answers
- Where Advanced File Shredder keeps its settings
- Registration and support
1. What Advanced File Shredder does
When you delete a file in Windows, even after emptying the Recycle Bin, only the file's entry is removed. Its contents stay on the disk until something else happens to be written over them, and recovery software can often bring them back. Advanced File Shredder destroys the contents first and removes the file afterwards:
- It writes over every byte of the file one or more times, using the method you pick in Settings.
- It also overwrites the file's hidden NTFS streams (alternate data streams) and, if you wish, the unused "tail" at the end of the file's last cluster.
- It can read the last pass back from the disk and check it before deleting the file, so you know the data really reached the disk.
- It can give the file a random name and an old date before deleting it, so the directory entry no longer shows what the file was called or when it was used.
Besides individual files and folders, it can shred everything in the Recycle Bin and overwrite the free space of a drive, which holds the remains of files that were deleted the ordinary way.
Shredding cannot be undone. There is no "restore" and no Recycle Bin for shredded data. Double-check the list before you confirm.
2. Before you start
Evaluation (trial) version
Until you register, a window appears at start-up that tells you which day of the 30-day evaluation period it is:
- Continue - opens Advanced File Shredder.
- Register - opens the page where you can buy a license.
- Quit - closes the program.
When the 30 days are over, the program tells you that the trial has expired and opens the product page.
Administrator rights
You do not need to run Advanced File Shredder as an administrator for normal use. Windows asks for administrator permission only when a free space wipe retrims an SSD. You can only shred files that your Windows account is allowed to change.
One copy at a time
Only one copy of the program runs. Starting it again brings the open window to the front.
3. The main window
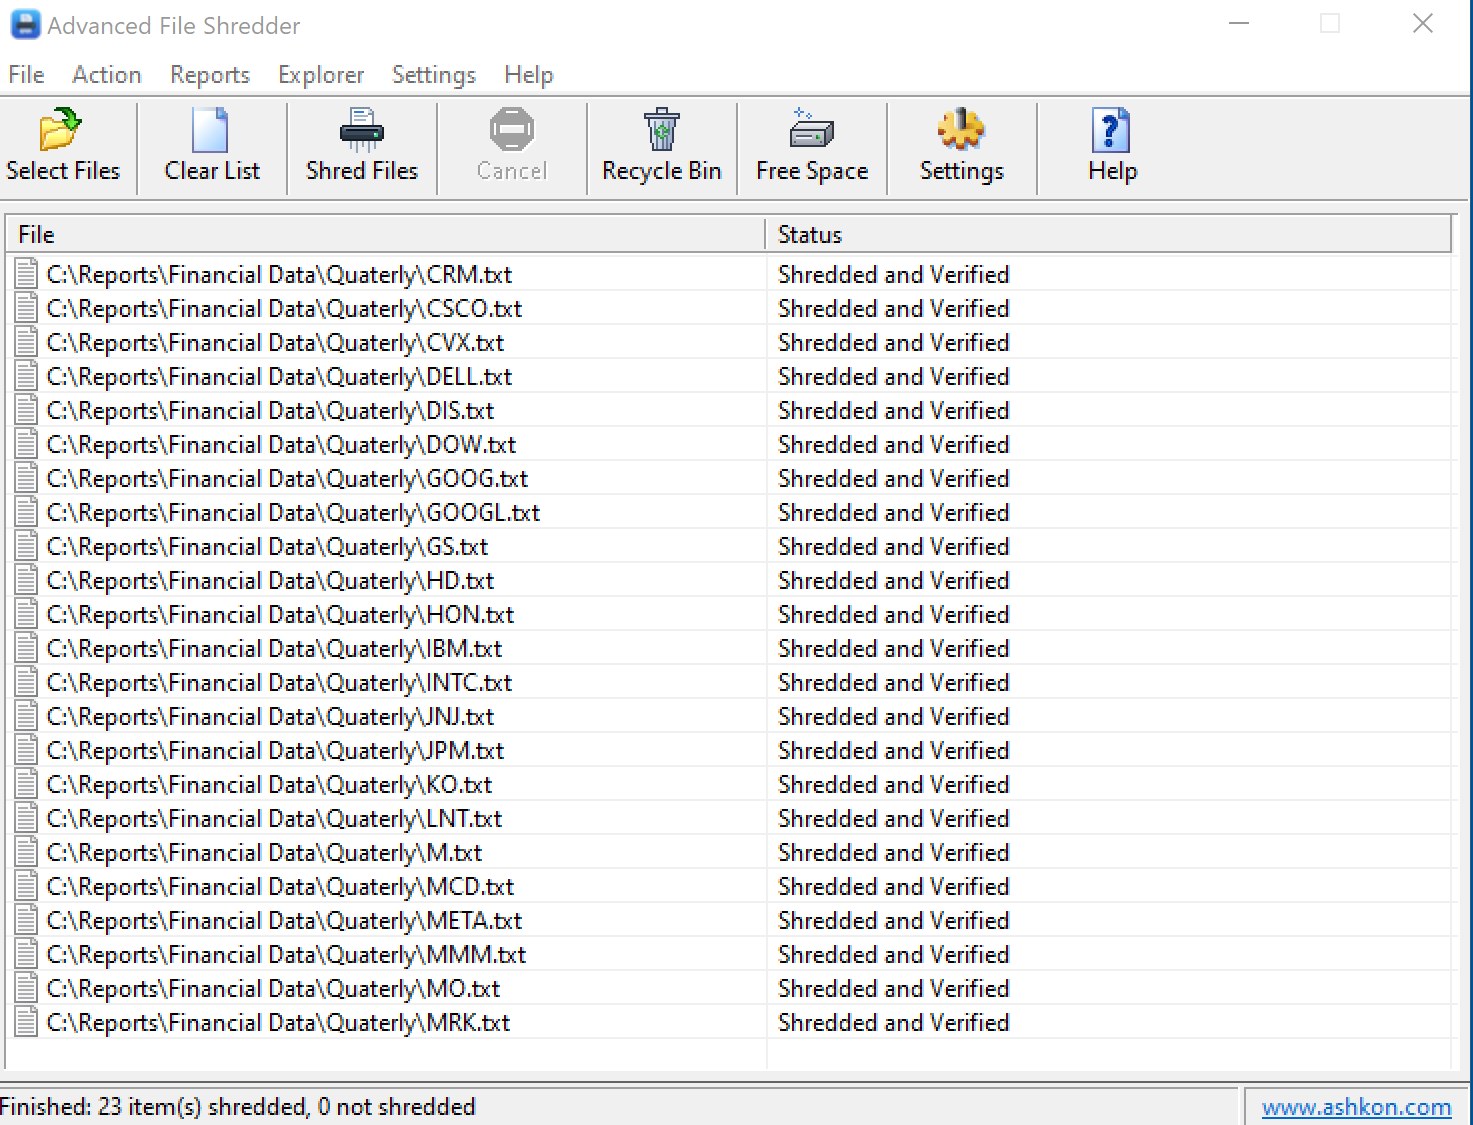
| Part | What it is for |
|---|---|
| Menu bar | File, Action, Reports, Explorer, Settings and Help. |
| Toolbar | Select Files, Clear List, Shred Files, Cancel, Recycle Bin, Free Space, Settings and Help. Hold the mouse over a button to see what it does. |
| The list | The files and folders waiting to be shredded, with two columns: File (the full path) and Status (see section 6). Rows that could not be shredded are highlighted, so problems stand out in a long list. |
| Status bar | What the program is doing right now, and the result of the last job, for example "10 item(s) shredded, 0 not shredded". |
While a job runs, the list is locked: you can scroll and select rows, but not add, clear or shred anything else until the job ends.
4. Putting files and folders on the list
Nothing is erased when you add items to the list. Shredding only starts after you confirm it (section 5). There are three ways to add items:
- Drag and drop files or folders from File Explorer or the desktop onto the list.
- Click Select Files on the toolbar (or File > Select Files...) and pick one or more files. Hold Ctrl or Shift to pick several.
- Right-click files or folders in File Explorer and choose Shred with Advanced File Shredder (see section 12).
To add a whole folder, drag it onto the list or add it from Explorer. A folder is shredded together with everything inside it, including its subfolders.
Tidying up the list
- Ctrl+A selects every row.
- Delete (or right-click > Clear) takes the selected rows off the list. The files themselves are not touched.
- File > Clear List (or the Clear List button) empties the list.
The list holds up to 10,000 items. If you add more, the program tells you how many did not fit.
5. Shredding files and folders
Shred everything on the list
Click Shred Files on the toolbar, or choose Action > Shred Files.
Shred only some rows
Select the rows, right-click one of them and choose Shred.
Confirm
A message lists the items (the first ten of them), the method and the number of passes, and whether each file is verified. Click Yes to start, or No to go back. No is the default button, so pressing Enter by accident does not erase anything.
What happens to each file
- The program makes sure it can open the file exclusively. A file that another program is using is left completely untouched.
- Each hidden NTFS stream of the file is overwritten, then the file's main contents, with every pass of the chosen method. With Overwrite cluster tails on, the writing continues to the end of the file's last cluster.
- With Verify erasure on, the last pass is read back directly from the disk, bypassing the Windows file cache, and compared with what was written.
- With Mangle file date and name on, the file's dates are set five years back and it is renamed to a random name of the same length.
- Finally the file is deleted.
If any step fails, the file is not deleted, and its row shows why. A file is only ever removed after all of its data has been overwritten (and, with verification on, checked). Read-only files are shredded too; if one fails, its read-only flag is put back.
Rows that have already been shredded are skipped if you click Shred Files again, so you can add more items to the same list and shred again.
Protected locations
To guard against accidents, some places can never be shredded. If you add one, its row shows "Protected Location (Not Shredded)" and a message tells you why:
- the root of a drive (for example
D:\) and folders where another drive is mounted; - the Windows folder and the Program Files folders, and anything inside them;
- your user profile folder and the folders that hold it, and the standard folders themselves: Desktop, Documents, Downloads, Pictures, Music, Videos, AppData, ProgramData and Public. You can shred files and subfolders inside these folders; you cannot shred the folders themselves.
The check also follows junctions, symbolic links and SUBST drives, so a shortcut route to a protected folder is refused as well.
6. What the "Status" column means
| Status | Meaning |
|---|---|
| Ready to Shred | On the list, waiting. |
| Writing Pass #1, #2, ... | Being overwritten now. |
| Verifying... | The last pass is being read back from the disk. |
| Shredded and Verified | Overwritten, checked and deleted. |
| Shredded Successfully! | Overwritten and deleted (verification was off). Also shown for a folder whose contents were all shredded and which was then removed. |
| Verification Failed (File Not Deleted) | What was read back does not match what was written. The file is kept. See section 14. |
| Overwrite Failed (File Not Deleted) | Windows reported an error while writing, for example the disk is full or faulty. |
| Failed to Open File Error / Access Violation Error | The file is in use by another program, or your account is not allowed to change it. |
| File Not Found Error | The file was moved or deleted after it was added to the list. |
| Failed to Remove File Error | The data was overwritten, but Windows did not let the file be deleted. Its original name is put back so you can find it. |
| Folder Not Fully Shredded | Some items inside the folder could not be shredded, so the folder was kept. The items that were shredded are gone. |
| Cancelled (File Not Deleted) | You stopped the job before this item was finished. |
| Protected Location (Not Shredded) | See Protected locations above. |
| Network File (Aborted!) | The item is on a network share. See section 13. |
| Link or Junction Skipped (Target Not Shredded) | The item is a shortcut-like link to another place. It is never followed. |
| Compressed or Special File (Not Shredded) | An NTFS-compressed, deduplicated or cloud (OneDrive placeholder) file. See section 13. |
| Hard-Linked File (Not Shredded) | The file has more than one name on the disk. See section 13. |
7. Stopping a job
Click Cancel on the toolbar, or choose Action > Cancel Shredding.
- Files and folders, Recycle Bin: the item being overwritten right now is finished, then the job stops. Items that were not started are left exactly as they were.
- Free space wipe: stops at once and removes its temporary files (this can take a moment).
If you close the window while a job runs, the program asks first. When you confirm, the item being overwritten at that moment is left in place, not deleted.
8. Settings: wiping method, options and passes
Open Settings > Settings... or click Settings on the toolbar. Your choices are used for files, folders and the Recycle Bin, and for free space when the single-pass option is turned off.
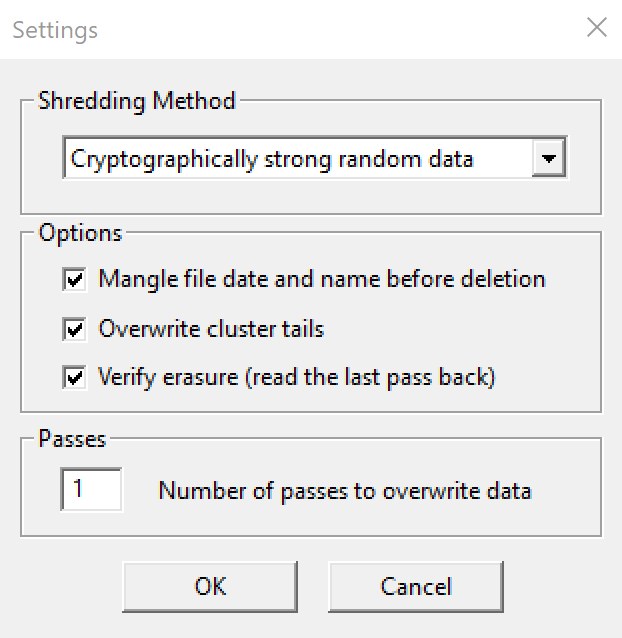
Shredding method
| Method | Passes | What is written |
|---|---|---|
| Cryptographically strong random data | 1 to 35, your choice | Every pass is random data from the Windows cryptographic generator. One pass is enough for any modern hard disk and is by far the fastest. More about random data. |
| US DoD 5220.22-M (default) | 7 | A character, its complement, two random passes, a second character, its complement, and a final random pass. |
| Gutmann | 35 | 4 random passes, the 27 fixed patterns in random order, then 4 more random passes. Designed for old disk encodings; very slow on large files. More about Gutmann's method. |
Options
- Mangle file date and name before deletion - renames each file and folder to a random name and sets its dates five years back before removing it, so the original name and dates no longer appear on the disk.
- Overwrite cluster tails - Windows stores files in clusters (often 4 KB). The space between the end of a file and the end of its last cluster can still hold pieces of older files. This option overwrites it too.
- Verify erasure (read the last pass back) - reads the last pass back from the disk, with the Windows file cache bypassed, and checks it before the file is deleted. A file that fails the check is not deleted. Verification is also what makes erasure reports available.
Passes
The number of passes can be changed only for the random-data method (1 to 35). For DoD and Gutmann it is fixed and shown for information.
Which method should I use? For everyday use, one pass of random data with verification on is fast and leaves nothing that software can recover. Choose DoD or Gutmann if a policy you must follow asks for them.
9. Shredding the Recycle Bin
Things you have deleted the ordinary way wait in the Recycle Bin, fully intact. To destroy them:
- Click Recycle Bin on the toolbar, or choose Action > Shred Recycle Bin Contents... (Or right-click the Recycle Bin on the desktop and choose Shred Recycle Bin contents.)
- The confirmation shows how many items there are, their total size, and the method.
- Click Yes.
The Recycle Bin of your Windows account on every drive is shredded: each item's contents and the small hidden record that stores its original name and location. Folders in the Recycle Bin are shredded with everything inside them. The status bar shows the progress ("item 3 of 25, pass 2 of 7").
When the job ends, a message tells you how many items were shredded and lists any that could not be; those stay in the Recycle Bin, where you can still restore them.
10. Wiping the free space of a drive
Files that were deleted before you had Advanced File Shredder are no longer listed anywhere, but their contents may still be in the drive's free space. A free space wipe overwrites all of it.
- Click Free Space on the toolbar, or choose Action > Wipe Free Space...
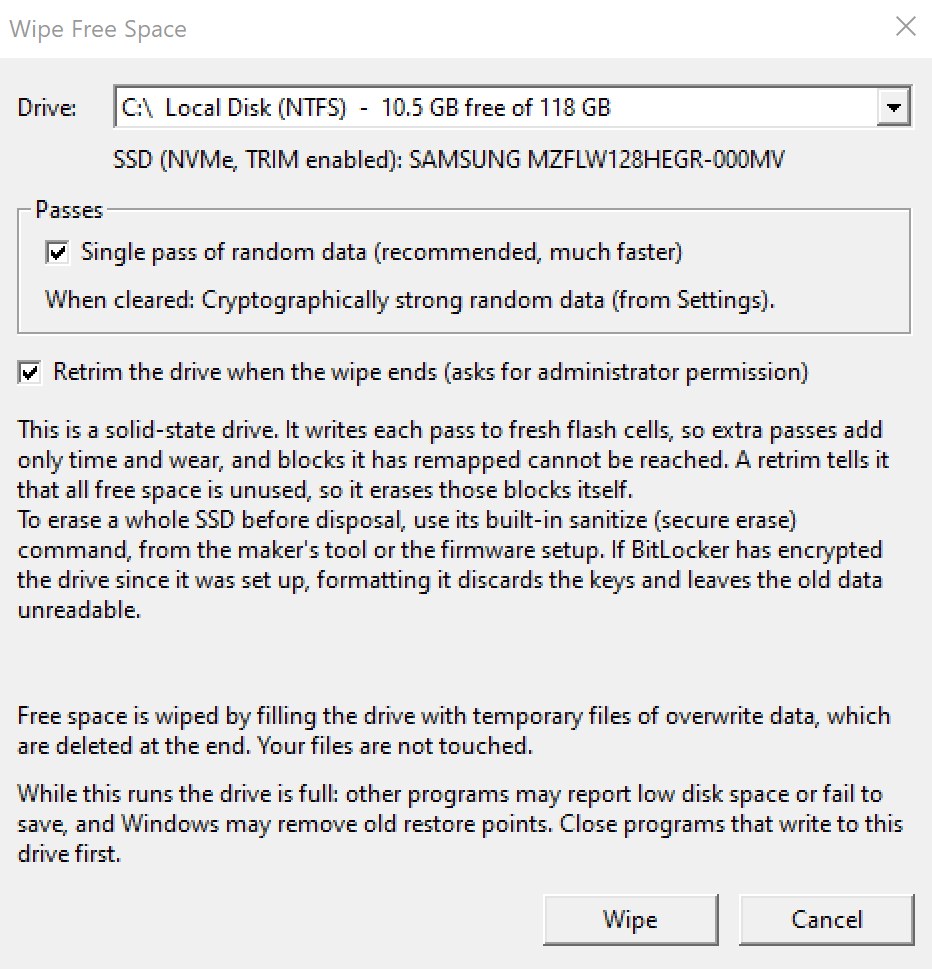
- Choose the Drive. The list shows each local drive, its file system and how much of it is free. Below it you see what kind of drive it is, for example "SSD (NVMe, TRIM enabled)" or a hard disk.
- Set the options (below) and click Wipe.
- A confirmation shows the free space, the passes and the amount of data to be written. Click Yes.
Options
- Single pass of random data (recommended, much faster) - one pass of random data. Clear it to use the method and passes from Settings instead. On a solid-state drive this option is turned on for you.
- Retrim the drive when the wipe ends - offered for solid-state drives that support TRIM. When the wipe finishes, the program asks Windows to retrim the drive (the same as Optimize in Windows' Optimize Drives). Windows asks for administrator permission.
The program remembers the drive and the options you chose for next time.
How it works
- The program fills the drive with temporary files of overwrite data in a work folder named
AFS-FreeSpaceWipe.tmpin the root of the drive, until no space is left. - On NTFS drives it then overwrites the unused records of the Master File Table, where Windows keeps very small files directly. Without this step, the contents of small deleted files would survive.
- With verification on, the last pass is read back and checked.
- All temporary files are then deleted. Your own files are never touched.
While the wipe runs the drive is full. Other programs may warn about low disk space or fail to save, and Windows may delete old System Restore points. Close programs that write to this drive before you start. If the program is stopped or closed, the temporary files are removed; if the computer loses power, the next wipe of that drive removes them.
Solid-state drives (SSD), memory cards and USB sticks
A solid-state drive does not write in place: each pass goes to fresh flash cells, and the drive keeps spare blocks that no program can reach. On an SSD:
- more than one pass adds only time and wear, never extra safety - use the single pass;
- keep Retrim on, so the drive learns that all free space is unused and erases those blocks itself;
- to erase an entire SSD before you sell or dispose of it, use the drive's built-in sanitize (secure erase) command from the maker's tool or the firmware setup. If BitLocker has encrypted the drive since it was set up, formatting it throws away the keys and leaves the old data unreadable.
On a hard disk, free space is overwritten in place; one random pass is enough on any modern hard disk.
Disk quotas
If a disk quota limits how much your account may store, the wipe can only fill the space available to you, and the result tells you so. Run Advanced File Shredder as an administrator to reach all of the free space.
11. Erasure reports
After a job you can save a detailed report of it as an HTML page, for your records or for an
auditor. Choose Reports > Generate..., pick a folder and a name (the
suggested name is like Shredder Report 2026-10-10 19-02.html) and click
Save. The program then offers to open the report in your browser, from where you
can also print it.
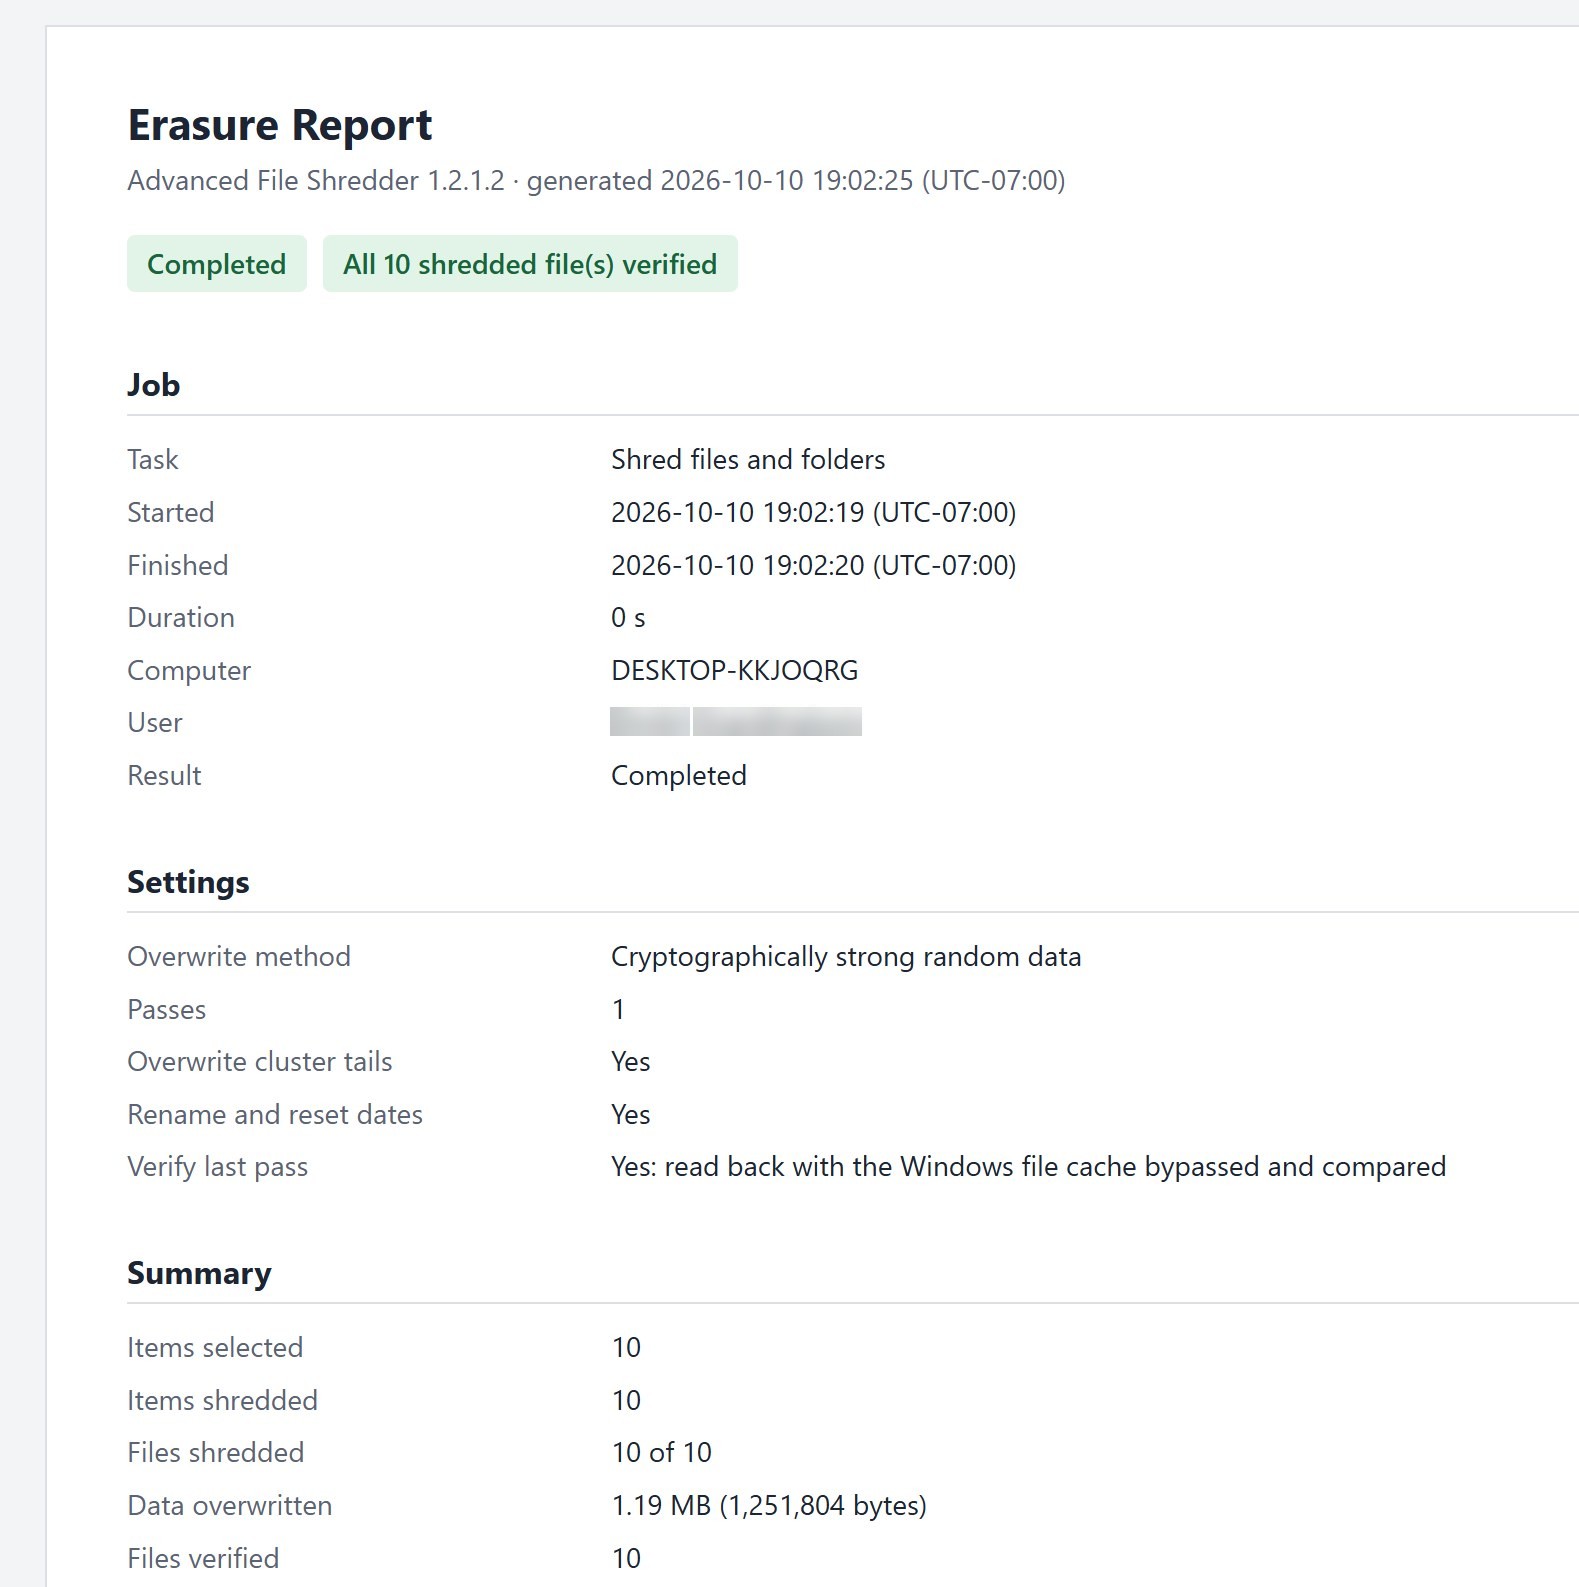
A report contains:
- Result badges - for example "Completed" and "All 10 shredded file(s) verified", or a warning if anything failed.
- Job - the task, start and finish time, duration, computer, user and result (Completed, Completed with errors, or Stopped before completion).
- Settings - overwrite method, passes, cluster tails, renaming and verification.
- Summary - items selected and shredded, files shredded, the amount of data overwritten and the files verified. For a free space wipe: the drive, its type and file system, the free space overwritten, the passes completed, the file records overwritten, the verification and the retrim result.
- Files and folders (or Recycle Bin items) - every item with its result.
Good to know
- Reports > Generate is available only when Verify erasure is turned on in Settings, and only after a job has finished.
- The report always describes the last job. Save it before you start the next one.
- For your privacy, the report is kept only in memory and nothing is written to disk unless you save it. Because it lists the names of the shredded files, store it where only the people who need it can read it.
12. Shredding from Windows Explorer
Advanced File Shredder can add two commands to File Explorer:
- Shred with Advanced File Shredder - on the right-click menu of files and folders.
- Shred Recycle Bin contents - on the right-click menu of the Recycle Bin.
The installer offers to add them. You can also add or remove them at any time with Explorer > Add Explorer Context Menu and Explorer > Remove Explorer Context Menu.
Choosing a command opens Advanced File Shredder (or brings it to the front) and adds the items to the list. Nothing is shredded until you confirm. If a job is already running, the request waits and starts when that job ends.
On Windows 11, both commands are under Show more options on the right-click menu (or hold Shift while you right-click).
13. What is not shredded, and why
In some cases overwriting a file would not actually destroy its old data, or would damage something else. Advanced File Shredder then refuses the item rather than pretend it was erased:
| Item | Why it is skipped | What you can do |
|---|---|---|
| Files on a network share or mapped drive | The server can keep copies (snapshots, previous versions, deduplication) that overwriting over the network cannot reach. | Shred the file on the computer that holds it. |
| NTFS-compressed files | Windows writes new data to new clusters, so the old clusters would be left as they were. | Uncompress the file (Properties > Advanced), then shred it. |
| Deduplicated, compact.exe-compressed or OneDrive "online-only" files | Their data is not stored in place in the file. | For OneDrive, choose "Always keep on this device" first, or delete the file in OneDrive. |
| Hard-linked files | The same data has more than one name. Overwriting it through one name would ruin the file under its other names. | Delete the other names first, then shred. |
| Symbolic links and junctions | They point elsewhere; following them could destroy data you did not choose. Inside a folder they are removed without being followed. | Add the real target folder instead. |
| Files in use | A program has them open. | Close the program and shred again. |
Also keep in mind that shredding removes data from the drive itself, not copies of it elsewhere: backups, cloud sync folders, System Restore points, File History and email attachments all need to be dealt with separately.
14. Troubleshooting - questions and answers
A file shows "Failed to Open File Error" or "Access Violation Error".
Another program has the file open (a document in Word, a photo in a viewer, a file being synced), or your account may not change it. Close the program and try again. For files of other users, start Advanced File Shredder as an administrator (right-click it and choose Run as administrator).
A file shows "Verification Failed (File Not Deleted)".
The data read back from the disk did not match what was written. This can point to a failing drive or a filter driver (for example some backup or encryption tools) that changes data on its way to the disk. The file was kept on purpose. Check the drive's health, then shred the file again.
Reports > Generate is greyed out.
Turn on Verify erasure in Settings, then run a job. The menu becomes available when the job ends.
The Explorer commands do not appear.
Choose Explorer > Add Explorer Context Menu. On Windows 11, look under Show more options. If Explorer still does not show them, sign out and in again.
A free space wipe takes a long time.
It writes as much data as the drive has free space, once per pass. Use the single pass option: it is the recommended setting and much faster. The status bar shows the speed and the estimated time remaining.
Windows warned "low disk space" during a free space wipe.
This is expected: the drive is deliberately filled. The space comes back when the wipe ends or is stopped.
The retrim did not happen.
Windows asks for administrator permission to retrim. If you declined, or the drive did not accept it, the result says so. You can retrim later yourself: open Optimize Drives in Windows, select the drive and click Optimize.
A folder shows "Folder Not Fully Shredded".
Some files inside it were in use, protected or of a kind that is not shredded (section 13). Everything else in the folder is gone. Fix the remaining files and shred the folder again.
15. Where Advanced File Shredder keeps its settings
| What | Where |
|---|---|
| Shredding method, passes, options and the last free space choices | Windows Registry:
HKEY_CURRENT_USER\Software\Ashkon_Technology\Shredder\Settings |
| Explorer commands | Windows Registry, under Software\Classes (added and
removed from the Explorer menu) |
| Erasure reports | Only in memory until you save one, in the folder you choose |
The program keeps no log of what you shred.
16. Registration and support
| Register (buy a license) | Register in the trial window, or order Advanced File Shredder online |
| Online help | Help > Contents... |
| Program version | Help > About... |
| Product page | Advanced File Shredder |
| Background reading | Strong random data, Gutmann's method, NTFS file streams |
| Contact | Contact Us - questions about ordering: order@ashkon.com |