
PingTrace
PingTrace User Guide
PingTrace runs ping and traceroute side by side against the same target. In one window you see whether the host replies and how quickly, each router along the way, the share of probes every router drops and the network that operates it – and, with continuous (MTR) mode switched on, how the path holds up over minutes rather than seconds. This guide explains every command, result column and setting in PingTrace 3.0.
Contents
- Getting started in four steps
- The main window and toolbar
- Columns of the ping list
- Columns of the traceroute list
- Watching a route over time (MTR)
- How to interpret what you see
- Finding out who owns an address
- Checking TCP ports
- The Settings dialog
- Saving and printing results
- Menus, tray icon and keys
- Requirements and licensing
1. Getting started in four steps
- In the Enter Host Name, URL or IPv4 / IPv6 Address box, type what you want to test: a name like
example.com, a web address likehttps://www.example.com/page, an IPv4 address like8.8.8.8or an IPv6 address like2001:4860:4860::8888. When you give it a URL, PingTrace keeps just the host part. - Hit Enter or press Start. Pinging and route tracing begin together. If you need only one of the two, press Ping or Trace instead.
- To force a protocol, press IPv4 or IPv6. The Start, Ping and Trace buttons follow the address family selected in Settings, which is Automatic unless you change it.
- Results fill the lists live, row by row. Esc or Stop halts everything; to end just one job, use Action > Stop Ping or Stop Traceroute.
2. The main window and toolbar
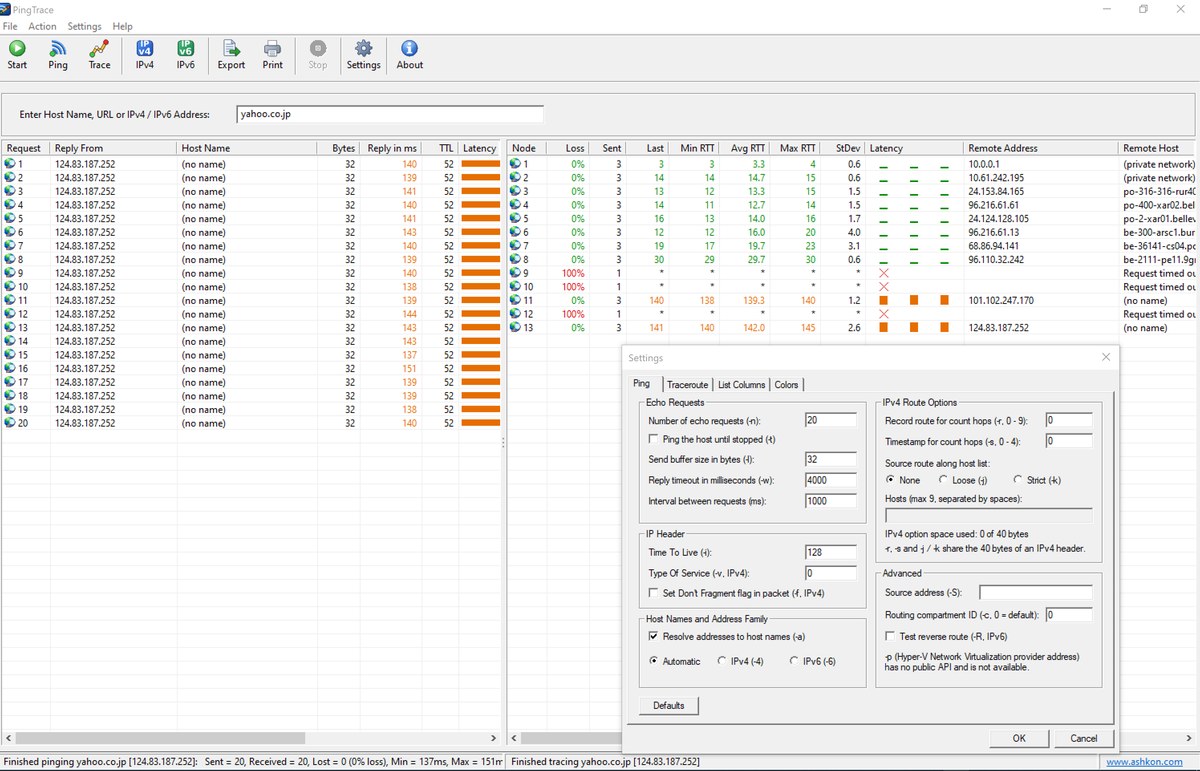
Below the toolbar and address box, the window is split in two: ping results on the left, the traced route on the right. Drag the divider to give either side more room. The divider position, the window size and every column width are remembered between sessions.
The status bar is divided into three areas. The first sums up the latest ping (packets sent, received and lost, plus the minimum, maximum and average time), the second sums up the latest trace, and the third links to the Ashkon Software website.
Toolbar buttons
| Start | Runs ping and traceroute together (Enter). |
| Ping | Only pings the target. |
| Trace | Only traces the route. |
| IPv4 | Runs both over IPv4 alone (-4). |
| IPv6 | Runs both over IPv6 alone (-6). |
| Export | Writes the ping list, the traceroute list or the two together to a file. |
| Sends the ping list or the traceroute list to a printer. | |
| Stop | Ends both ping and traceroute (Esc). |
| Settings | Opens the Settings dialog. |
| About | Displays the version number and registration details. |
3. Columns of the ping list
Every row stands for a single echo request. Unless you change it, PingTrace sends 20 of them at one-second intervals.
| Column | Meaning |
|---|---|
| Request | The request’s sequence number. |
| Reply From | Which address answered. Normally that is the target; if a router appears here instead, the reply is an error such as “TTL expired in transit”. |
| Host Name | Reverse DNS name of the answering address, filled in when Resolve addresses to host names (-a) is turned on. |
| Bytes | How much data the reply carried. |
| Reply in ms | Round-trip time in milliseconds, colored according to the latency thresholds. |
| TTL | Time To Live of the returned packet (IPv4). Because replies typically leave with 64, 128 or 255, the value gives a rough idea of how many routers the reply crossed. |
| Latency | A bar sized by the reply time and colored by the latency thresholds. |
| Status | What happened when no normal reply came back – Request timed out, Destination host unreachable and so on. |
| Route / Timestamps | Addresses and timestamps stored in the packet when you use the IPv4 options Record route (-r), Timestamp (-s) or source routing (-j / -k). |
4. Columns of the traceroute list
One row per hop (router) along the path, with the destination itself as the final row. Each hop gets 3 probes by default.
| Column | Meaning |
|---|---|
| Node | Hop number, counted from 1 – typically your own router. |
| Loss | Share of probes to the hop that went unanswered, in percent, colored by the loss thresholds. |
| Sent | Probes sent so far to the hop; in MTR mode this keeps rising with each cycle. |
| Last | Round-trip time of the newest reply, in ms. |
| Min / Avg / Max RTT | Quickest, mean and slowest round-trip time across all replies, in ms. |
| StDev | Standard deviation of the round-trip times, i.e. jitter. Large values mean the hop’s delay swings widely. |
| Latency | Sparkline of recent probes: taller bars are slower replies, and a red cross is a probe that went unanswered. |
| Remote Address | The hop’s IPv4 or IPv6 address. |
| Address Type | Public, Private (RFC 1918), CGNAT (RFC 6598), Private (ULA), Public (Teredo / 6to4) or some other special-purpose range. |
| Remote Host | Reverse DNS name of the hop. Router names frequently contain a city or airport code that reveals their location. |
| ASN | Autonomous System number of the owning network, e.g. AS7922. |
| AS Name | The organization running that network. |
| Network | BGP prefix announced for the address, e.g. 24.153.64.0/19. |
| Country | Where the AS is registered – which may differ from where the router physically sits. |
| Registry | The Regional Internet Registry responsible: ARIN, RIPE NCC, APNIC, LACNIC or AFRINIC. |
Hops with private or CGNAT addresses have no public ownership records, so the ASN-related columns remain blank for them. In either list, clicking a column header sorts by that column, and numeric columns sort by value rather than as text.
5. Watching a route over time (MTR)
One pass of traceroute fires only a handful of probes at each hop, which makes brief spells of loss or delay easy to overlook. Continuous mode repeats the trace over and over and folds every pass into cumulative per-hop statistics – the same idea as the mtr utility on Linux and macOS.
- Switch it on from Action > Continuous Traceroute (MTR), or make it the default on the Traceroute page of Settings with Trace continuously and keep running per-hop statistics.
- Cycles is the number of passes; enter 0 to keep going until you press Stop. Interval between cycles is the wait between passes, 1000 ms by default.
- Sent and Loss include the probes from every pass. Last holds the newest reply, while Min, Avg, Max and StDev are computed from all replies. The Latency sparkline covers the 64 most recent probes.
- Leave it running for several minutes while the trouble is actually happening – say, a choppy video call or a lagging game – and then find the earliest hop where loss or jitter appears and carries on all the way to the destination.
6. How to interpret what you see
- A hop showing “Request timed out”, * in the RTT columns and 100% loss simply did not answer in time. Plenty of routers drop or throttle traceroute probes while still passing ordinary traffic, so one quiet hop partway along the path is rarely a concern.
- Genuine trouble looks like loss or added delay that persists on every later hop through to the destination. Focus on the hop where it first shows up.
- If only one intermediate hop shows loss and the destination shows 0%, that router is just limiting how often it answers – your traffic is not being lost.
- For the destination itself, trust the ping list: steady ping replies mean the host is reachable, regardless of what the hops in between report.
- A big RTT step between two hops in different cities or countries is expected; it reflects the physical distance covered. Look at the AS Name and Remote Host columns to spot where your provider passes traffic on to another network.
- A host that never answers ping may be blocking ICMP, either itself or through a firewall. Run a TCP port check to find out whether its services are running.
What the colors mean
Out of the box, latency is shown green up to 50 ms, yellow up to 100 ms, orange up to 200 ms, red up to 400 ms and dark red beyond that. Loss is green under 1%, yellow from 1%, orange from 5% and red from 20%. You can adjust these limits on the Colors page of Settings.
7. Finding out who owns an address
Right-click any row in either list and pick Whois / IP Info.... The IP Info window then lists:
- the IP address with its reverse DNS name, AS number and AS organization;
- the address’s RDAP registration record – network name and handle, address range and CIDR, country, organization, abuse e-mail and other contacts, plus the registration and last-changed dates.
Copy puts the report on the clipboard; View RDAP Record shows the original record in your browser. Keep in mind that opening this window sends the address to rdap.org and to the registry responsible for it, and to Team Cymru for the AS lookup. The right-click menu also offers Copy IP Address.
8. Checking TCP ports
Since many servers and firewalls refuse ping, silence to ping does not prove a host is down. Open Action > TCP Port Check..., or right-click a row and choose TCP Port Check... to test that particular address.
| Host | Name or IP address to test. |
| Ports | Individual ports and ranges, such as 22, 80, 443, 3389, 8000-8010 – at most 1024 ports. |
| Timeout (ms) | How long each connection attempt may take. |
| Attempts per port | How many tries each port gets. |
Press Check. PingTrace opens a TCP connection to each port and reports one of four outcomes:
| Open | A service is accepting connections. |
| Closed (refused) | No service listens there, but the host itself is up. |
| No answer (filtered) | Nothing came back at all – usually a firewall. |
| Unreachable | The network reported that the host cannot be reached. |
- Alongside the result you get the connect time, the minimum and maximum time, how many attempts were answered, and the IANA service name and description for every port.
- Service names are taken from the IANA port registry, which PingTrace fetches from iana.org and renews every 30 days; Update from IANA fetches it immediately. Until the first download, a built-in list of common ports fills in.
- Copy places the results on the clipboard as tab-separated text.
9. The Settings dialog
Open it from the Settings toolbar button, or jump straight to a page through the Settings menu. Next to each option, in parentheses, is the matching switch of the Windows ping or tracert command. Defaults puts the current page back to its original values. Your settings are stored and carried over when you upgrade from an older PingTrace version.
Ping
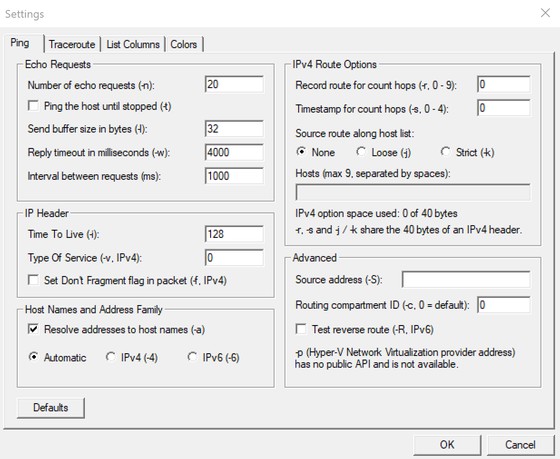
| Number of echo requests | -n, 20 by default – or tick Ping the host until stopped (-t). |
| Send buffer size in bytes | -l, 32 by default: the amount of data in each request. Bigger sizes combined with Don’t Fragment help you discover the path MTU. |
| Reply timeout in milliseconds | -w, 4000 by default. |
| Interval between requests | 1000 ms by default. |
| Time To Live | -i, 128 by default. |
| Type Of Service | -v, IPv4 only. |
| Set Don’t Fragment flag | -f, IPv4 only. |
| Resolve addresses to host names | -a. |
| Address family | Automatic, IPv4 (-4) or IPv6 (-6). |
| IPv4 Route Options | Record route for as many as 9 hops (-r), Timestamp for as many as 4 hops (-s), and Loose (-j) or Strict (-k) source routing through a list of up to 9 hosts. All of these compete for the 40 bytes of option space in the IPv4 header, and the dialog shows how much of it is taken. Their output goes to the Route / Timestamps column. |
| Advanced | Source address (-S), Routing compartment ID (-c) and Test reverse route (-R, IPv6). The -p switch (Hyper-V Network Virtualization provider address) is missing because Windows offers no public API for it. |
Traceroute
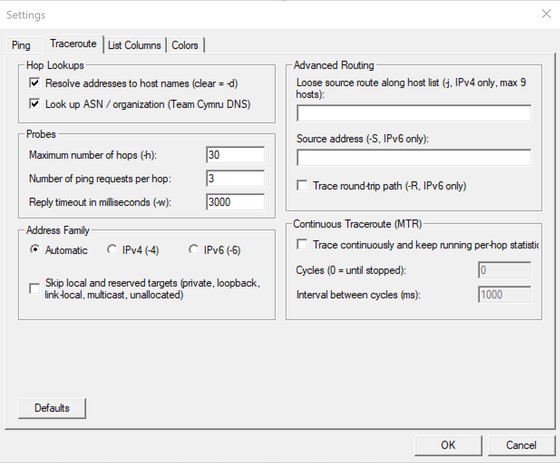
| Resolve addresses to host names | Populates the Remote Host column. Untick it – the equivalent of tracert -d – to speed up the trace. |
| Look up ASN / organization | Populates ASN, AS Name, Network, Country and Registry using the Team Cymru DNS service. |
| Maximum number of hops | -h, 30 by default. Set it too low and the trace gives up before reaching a far-away host. |
| Number of ping requests per hop | 3 by default. More probes mean more reliable figures but a slower trace. |
| Reply timeout in milliseconds | -w, 3000 by default. Too short a value makes sluggish routers appear unresponsive. |
| Address Family | Automatic, IPv4 (-4) or IPv6 (-6). Skip local and reserved targets declines to trace private, loopback, link-local, multicast and unallocated addresses. |
| Advanced Routing | Loose source route through up to 9 hosts (-j, IPv4 only), Source address (-S, IPv6 only) and Trace round-trip path (-R, IPv6 only). |
| Continuous Traceroute (MTR) | Described in section 5. |
List Columns
Pick which of the 9 ping columns and 17 traceroute columns are visible. Hiding the ones you don’t need keeps the lists readable on small screens. Columns you hide are also left out of exports and printouts.
Colors
Enable or disable coloring, set the latency limits in milliseconds for green, yellow, orange and red, and set the packet-loss limits in percent for yellow, orange and red. In the traceroute list the colors apply to Last, Min, Avg and Max RTT, Loss and the Latency sparkline; in the ping list they apply to Reply in ms and the latency bar.
10. Saving and printing results
- Use Export on the toolbar, the File menu, or Export This List... from a list’s right-click menu. You can save the ping list, the traceroute list, or both in a single file.
- Pick CSV (comma-separated, opens in Excel) or tab-separated text. The proposed file name follows the pattern
PingTrace-<list>-<host>-<date>.csv. - In a combined export, each section begins with the host and the test date and time, then the ping statistics – a convenient file to attach when you open a ticket with your Internet or hosting provider.
- To print, press Print or choose File > Print Ping List or Print Traceroute List.
- Clear List on the right-click menu empties a list.
11. Menus, tray icon and keys
| Menu | Commands |
|---|---|
| File | Export Ping List, Export Traceroute List, Export Both Lists, Print Ping List, Print Traceroute List, Exit |
| Action | Start Ping and Traceroute, Start using IPv4 / IPv6, Ping Only, Traceroute Only, Continuous Traceroute (MTR), Stop All, Stop Ping, Stop Traceroute, TCP Port Check, Open Host in Web Browser, Flush DNS Cache |
| Settings | Ping, Traceroute, List Columns or Colors page of the Settings dialog |
| Help | Register Now (order page), Contents (online help), Ashkon Software Web Site, About PingTrace |
| List right-click menu | Whois / IP Info, Copy IP Address, TCP Port Check, Export This List, Print This List, Clear List |
| Tray icon menu | Ping and Trace, Ping, Trace, Show, Exit |
- Flush DNS Cache empties the Windows DNS resolver cache, forcing a fresh lookup of a host name whose address has just changed.
- Minimizing PingTrace sends it to the notification area (system tray). From the tray icon’s right-click menu you can launch a ping or trace, or pick Show to restore the window.
- Enter or F5 starts ping and traceroute; Esc stops them.
12. Requirements and licensing
PingTrace runs on Windows 7, 8, 8.1, 10 and 11 (32-bit and 64-bit) with IPv4 or IPv6 connectivity. Testing over IPv6 needs an IPv6 Internet connection, and the Whois / IP Info window, ASN lookups and IANA service names require Internet access.
PingTrace is shareware with a free 30-day trial. To keep using it after that, buy a license for $19.95 – choose Help > Register Now! in the program or use the Buy now button on this page. Each license covers one person or one workstation.
Need help? See the PingTrace product page or contact us. Questions about ordering: order@ashkon.com.